
Subject:
|
U.S. 82nd Airborne with base
|
Scale:
|
1/9
|
Manufacturer:
|
Legend productions
|
Price
|
US$30,00+ shipping
|
Description
|
Resin cast. No decals
|
Comments
|
This is Legend's 1/9 U.S. Airborne trooper bust. The quality of the casting is fantastic, with no air bubbles. Details are very nice and not affected by the resin molding blocks. Bellow you can see the parts you get in the box. They came in a sealed bag with bubble plastic for protection. As this is a construction description, more details will be added along the building process.
|
1) Kit parts:


2) Painting the face: I used the lifecolor flesh paint set for the face. You get six bottles of acrylic paint, witch are: two base colors, two highlight tones and two shadow tones.

First i gave the head a primer coat using tamiya XF19 grey:

Next i airbrushed the lightest skin tone base color of the Lifecolor set:

Next i airbrushed the first shadow tone in some areas:

When i got a good definition of the recessed parts of the face, i blended the tones with a very diluted solution of the first base color.

Now, with a pointed paint brush, i added several layers of highlight and shadow, always with diluted paint. It is better, when working with acrylics, to get several light layers and not all colors in a single time.

At the end, to avoid the "clown look" on the face of my figure, i again airbrushed a heavily diluted solution of paint. This time i used Tamiya flesh.

Know, using Vallejo acrylics, i painted the eyebrows and the eyes.


Using dark grey also from Vallejo, i painted the hair


Just a light drybrush with a sand color added a nice tone to the otherwise pure black hair.


Next came the last details of the head.


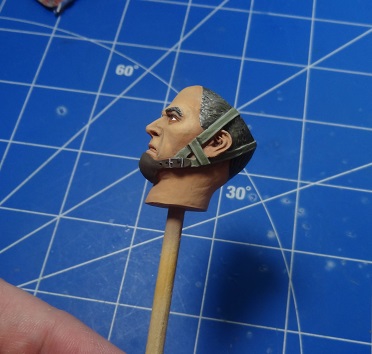
3) The helmet: Again i used a prime coat with Tamiya XF-19

Next, i airbrushed a coat of Tamiya Khaki drab.

I then drybrushed a yellow tone to the helmet to highlight the net.

Several details were also painted with Vallejo acrylics.

4) The head is almost finished. Some small details will be added once it get attached to the torso.

5) Torso: I started by working with my airbrush. First a sand color was applied as a base coat. Then i added brown to the base color to paint the shadows. I increased contrast by adding white to the base color and applying it to the more superficial parts of the kit.


To decrease contrast to a more realistic level, i airbrushed a very diluted solution of the base color over the model. It was diluted to a 9:1 ratio of X20A thinner to paint and airbrushed with high pressure and from 15cm away.


I think it is easier to work with a paintbrush over a gloss finish. You get better control over the paint flow. So i sealed the work done so far under a coat of future.

Then came the brush. First i painted the shadow areas close to the edge of the details. I used Vallejo acrylics for this job. Here the color chosen was English uniform


Once the shadows were completed, i used a light color to increase contrast at the edge of the details. This time i worked with Vallejo Iraqui Sand mixed with white in a 2:1 ratio.

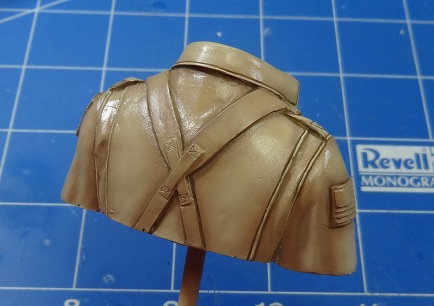
Once the edging was done, i painted all the details with several colors from the Vallejo brand.


All parts were brought together and sealed under a coat of future.

The gloss finish was eliminated by a final coat of Humbrol Matt varnish.

The project is complete! This is a kit more related to painting skills then other subjects. I like to practice with these different skills ranging from airbrushing to paintbrushing.

No comments:
Post a Comment
Note: Only a member of this blog may post a comment.